
If your kid is curious about photography, or if you, as a parent, are interested in giving this point & shoot exercise some extra meaning, you need to guide your kid: Teach them the basics, explain how the camera operates and provide feedback on their technique and photos. This will make a difference: your kids will improve their photography skills, and all of you will enjoy this time together.
Teaching Kids Photography With Your iPhone - Main Advantages
One of the essential things you need in order to teach photography to your kid, is obviously a… camera – a toy camera (if your kid is very young, 3-6 years old), a Polaroid camera, a digital camera or just your iPhone or iPad. The reason you need a camera is not only because photography is all about cameras, or because this is the only way to take photos, but also because the camera itself has a key role in the teaching process.
Did you read our articles about teaching photography to your kids? you can find it here:
Basic Photography Terms For Kids and Beginners
Photography For Kids - How to Teach Your Kids the Basics
Teaching Photography to Kids: Selecting the Right Approach
How to Teach Kids Photography – 11 Tips
5 Great Ideas for Photography Projects For Kids
When considering the camera as a tool for teaching, you may find out that your iPhone can be a very useful tool. Why? Because iPhones have some very valuable features that can make the teaching much easier a lot more productive:
- Photography basic terms and principles (i.e. exposure, the rule of thirds, etc.) can be explained quite easily, as the iPhone has specific, easy to use features that support these concepts.
- Practicing photography is very easy and bears no extra cost – your kid can take as many pictures as they like. The more pictures they take, the better your kid will become.
- Giving feedback is very easy, as the photos can be reviewed immediately. Additionally, you can zoom in or out by pinching and spreading two fingers together or apart.
- Last but not least - It’s digital – and therefore has all the advantages of digital photography: good photo quality and the ability to edit the photos, save or delete them.
How Can Your iPhone Help You Teach Photography to Your Kids?
Learn the Rule of Thirds
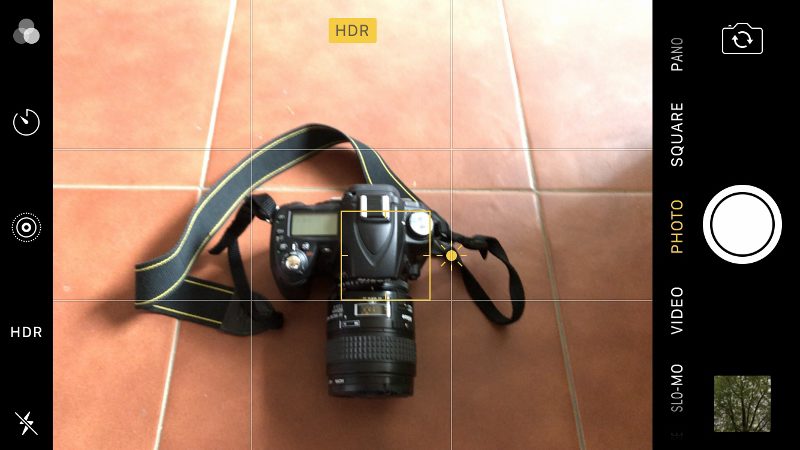
one of the most basic principles in composition is the Rule of Thirds (Click on Basic Photography Terms to learn more about this rule and other important photography principles). Your iPhone makes it very easy to teach this to your kid since they don’t need to imagine these gridlines. You can just add it to the display. How? Go to Settings -> Photos & Camera, then scroll down to Grid and enable it.

Adding the grids to the iPhone camera display (as in the photo at the right) helps practicing the Rule of Thirds
Focus
One of the most important photography principles, which makes photos sharp or blur, is focus. In usual cameras, in order to determine the focus point, you usually use the various symbols in your camera display as well as a half press on the camera’s shutter button.
Setting the focus in your iPhone is much easier, and you can use it to teach your kid what the meaning of a focus is:
First, the focus point can be determined very easily. Once the picture’s composition is clear, ask your kid to tap the screen, on the object which they want the camera to focus on. A yellow square will appear around the tapping point (see the yellow square on the camera at the photo below). This is where the camera is going to focus on. If your kid wishes to change it – no problem. Tap the screen again to cancel the former focus point and then tap a new point.
One more important lesson you can teach your kid is the impact of locking the focus. This technique is very common and used by many photographers to take great photos, in which the object in focus is at the background, which makes the foreground blur, or vice versa – the object at the foreground is clear and vivid while the background is blur.
In this case what you need to do it tap and hold your finger for a second or two, until you see the following note on the upper part of the display: AE/AF LOCK. At this point your kid can remove his finger from the display and change the composition. The focus will remain as it was set until your kid cancels it.
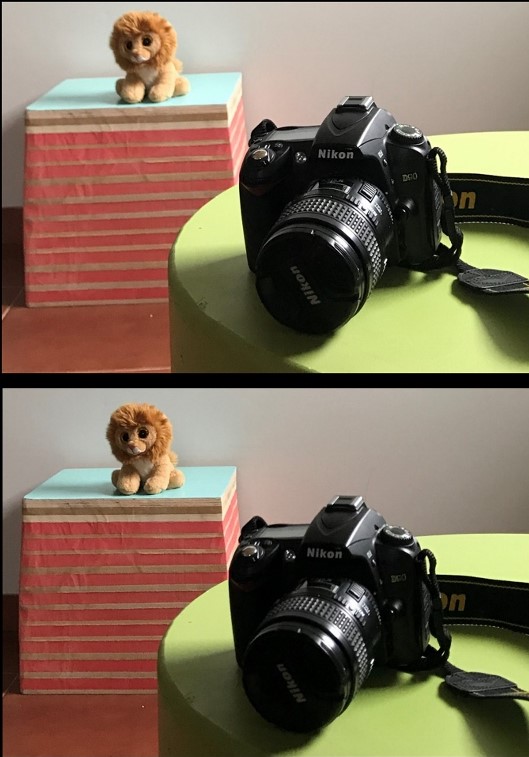
Same photo taken twice - at the photo at the top, the Nikon camera is in focus (and the lion is blurry). At the photo below, the focus is on the lion (and therefore the camera is blurry)[/caption]
Exposure
Exposure is a critical ingredient in any photo. Different exposure levels result in darker or brighter photos, which makes a big difference in the photo quality.
Your iPhone can help your kid experiment and experience the impact of different exposure levels. How? In the previous section I explained how to set the focus and about the yellow square you see on the screen. Do it again now and you’ll notice that to the square’s right there is a small “sun” symbol. If you drag your finger down, the exposure will be less and picture will be darker. If you will do the opposite, the picture will get brighter.
Let your kid try it. I recommend asking them to take the same photo with different exposure levels and then compare the results.
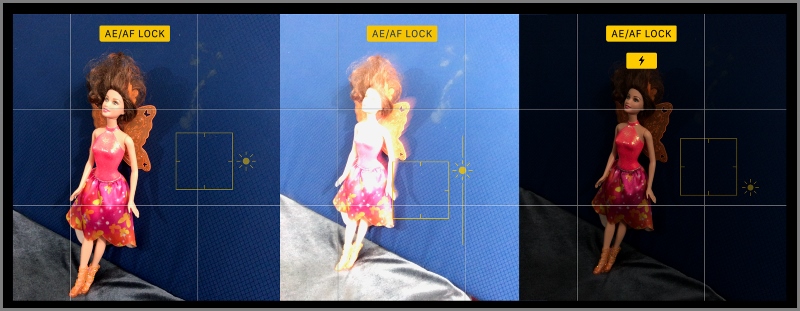
The same photo with different exposure levels. Follow the little "sun" icon
Take Many Photos
one of the most basic principles in any learning is practice. The more you practice, the more experience you gain and the better your skills become. In photography, the practice is taking photos, as many as possible. And what can be easier and more accessible than turning on your iPhone camera and letting your kid take pictures? They cost nothing, right?
Does your kid already have their own camera? check our buyers' guides here:
One Important Note
Don’t exaggerate by letting your kid take more and more photos without proper guidance and control. Do it for practice, not for any other reason. Our purpose is to teach kids photography and enjoy, while taking advantage of the low cost of photos, but not to spend time in an endless “point and shoot” exercise.
Big Display
Remember these old pocket film cameras we once had? With the very narrow viewfinder? Working on the photo composition was much more difficult when you had to use this small viewfinder. Take advantage of the big iPhone screen, not only to set the focus and exposure level as mentioned above, but also to discuss the composition with your kid before they shoot the picture. Did they fill the frame? Are they close / far enough from the subject? Are they properly following the Rule of Thirds? Raising all these questions and dealing with them is much easier with the big iPhone display in front of you.
Click on How to Teach Kids Photography – 11 Tips to learn more about the essential photography and composition principles.
Shutter Button Usability
If you’ve taken many photos with your iPhone, you’ve probably noticed that sometimes the location of the shutter button at the bottom of the display is not ideal – there are situations where the photo’s composition, the iPhone’s size and your hand’s size just don’t match – it’s hard to press the shutter button and the picture turns out blurry. This is particularly true when you want to take pictures from a very low point, the floor, for instance.
This can be solved by using one of the volume buttons, which in my experience, are much more comfortable and easy to use – for both adults and children. This tip is extremely useful if you are trying to teach your kid to “hold the camera still” lesson (or otherwise the photo will end up blurry).
One more alternative shutter button is… the headphones. Connect the headphones to your iPhone, turn on the camera, and instead of pressing the regular shutter button on the screen, press the + or – of your headphones volume control. It works!
It can very useful if you are teaching your kid to take night photos. In night photos, or in any other dark scene, the exposure time is longer, which means that there is a higher chance that the camera (=iPhone) will move and the picture will end up blurry. This is why most photographers use a tripod and a shutter cable – to avoid the impact of the human hand movements (even the slightest movements can harm the picture). The headphones, therefore, solve this – your kid can place the camera wherever they like – lean it against a toy, a bunch of books, or even a tripod – and use the headphones buttons to take the shot.
Review and Give Feedback
one of the common features of smartphones is the ability to zoom into each and every photo. This is very useful when trying to give feedback on photos. When you zoom in, you can learn which objects are vivid, which are bright or dark, and then compare it to the photographer’s intents. If the desired object is sharp and bright – great. If not – take a second shot.
2 Final Notes
- iPhone is a great product with an excellent camera and super photos quality, but don’t make it your kid’s camera. Use it as a tool to learn and practice. Let your kid experience and enjoy the marvelous world of photography by taking many photos from time to time and using some Apps. But – let a real camera be your kid’s camera and main tool for taking photos. It will make a difference.
- iPhones are significantly more expensive than any kid’s camera you could find (the iPhone 7, for example, costs 13 times more than the FujiFilm Instax Mini 8), and at the same time, the chance that it will be dropped to the floor and damaged is higher. You know kids – they have a tendency to break things… So watch your iPhone while your kid is using it. As opposed to most kid’s camera, the iPhone has no strap.